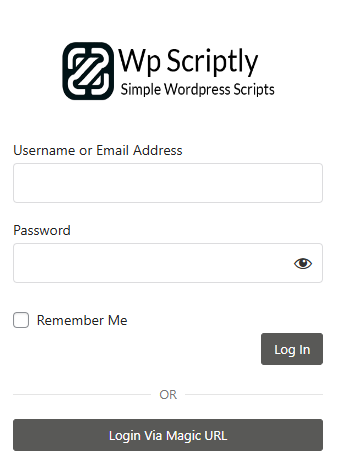
Custom WordPress Login Form with CSS and PHP

Creating a custom WordPress login form involves integrating PHP and CSS to enhance both functionality and aesthetics. This process includes designing the form layout with HTML, styling it with CSS for a polished appearance, and utilizing PHP for backend validation and processing. Key elements include customizing form fields (username, password, and submit button), ensuring proper form validation, and handling user authentication securely. Additionally, incorporating responsive design principles ensures the form looks great on all devices.
I use fluent snippet plugin for all my functions, js, and CSS:
Please customize the logo and url to matfch your website, you might also have to change the height and width for it to fit right.
*This will require knowledge of PHP and CSS.
function wsv_password_protected_logo() {
?>
<style type="text/css">
body.login {
    background: #fff;
    display: flex;
    align-items: center;
    justify-content: center;
}
body.login div#login h1 a {
    background-image: url(https://wpscriptly.com/wp-content/uploads/2024/05/new-logo-1.png);
    margin: 0 auto;
    width: 100%;
    height: 100px; /* Set a height for the container */
    background-size: 220px 100px; /* Adjust the size of the background image */
    background-repeat: no-repeat; /* Ensure the image doesn't repeat */
}
.login #backtoblog,
.login #nav {
    display: none;
}
.login label {
    color: #222;
}
.login-form {
    margin-top: 0px !important;
}
.login form {margin-top:0px!important;}
.login form {
    background-color: #fff !important;
    padding: 20px !important;
    border:0 !important;
    box-shadow:none !important;
}
input#user_login,
input#user_pass {
    border: 1px solid #dcdcde !important;
}
.dashicons,
.dashicons-before:before {
    color: #333 !important;
}
.wp-core-ui .button-primary {
    background: #595957 !important;
    border-color: #595957 !important;
    color: #fff !important;
    text-decoration: none;
    text-shadow: none;
    border-radius: 1px;
}
.wp-core-ui .button-primary:hover {
    background: #111110 !important;
    border-color: #111110 !important;
    color: #fff !important;
    text-decoration: none;
    text-shadow: none;
}
#login {
    padding: 0px !important;
}
.login .privacy-policy-page-link {
    display: none;
}
body.login div#login h2 {
    text-align: center;
    font-size: 16px;
    color: #587d71;
}
.login #login_error,
.login .message,
.login .success {
    border-left: 4px solid #587d71 !important;
    padding: 12px !important;
    text-align: center !important;
    margin-left: 0;
    margin-bottom: 20px;
    background-color: #587d71 !important;
    color: #222 !important;
    box-shadow: none !important;
    border-radius: 5px;
}
</style>
<?php
}
add_action( 'login_enqueue_scripts', 'wsv_password_protected_logo' );

function wsv_password_protected_message() {
echo '<h2>Password Required for Access</h2>';
}
add_action( 'password_protected_login_message', 'wsv_password_protected_message' );

function put_my_url(){
return "https://wpscriptly.com/"; // your URL here
}

add_filter('login_headerurl', 'put_my_url');
The Login Via Magic URL is apart of another pluging called FluentAuth.


Add your first comment to this post
You must be logged in to post a comment.